DIY Mickey ears are what you’ll often see at Disneyland, especially with Beauty and the Beast for inspiration!
A few weeks ago, we had the chance to take Ava to Disneyland for the first time! I was so excited for her to see all the magic. It had been years since I was a child so I researched all things Disneyland.
Beauty and the Beast DIY Mickey Ears
By Meagan Mora, Special for CraftyChica.com

Guess what? Scores pf people make their own unique Mickey ears to wear around the park!
Ding! Ding! Ding! My inner maker itched to try my hand at it. So I brainstormed. And I Pinterested.
I found an awesome Cruella Deville pair that Ava instantly loved.

I put them on the list. We were going to be there for three days so I wanted to make more than one pair. I wanted something different for the next pair. Something no one else would have.

Then it hit me.
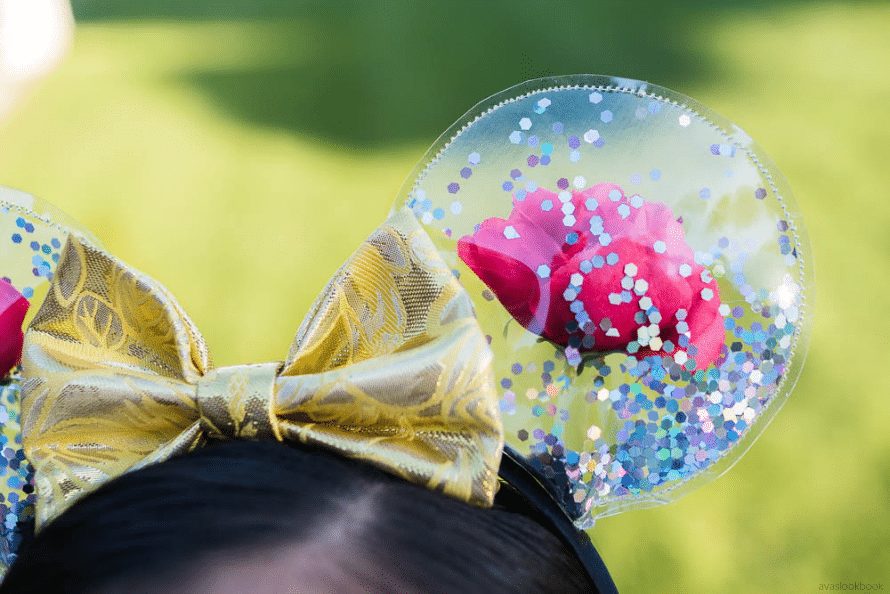
Beauty and the Beast Enchanted Rose DIY Mickey Ears
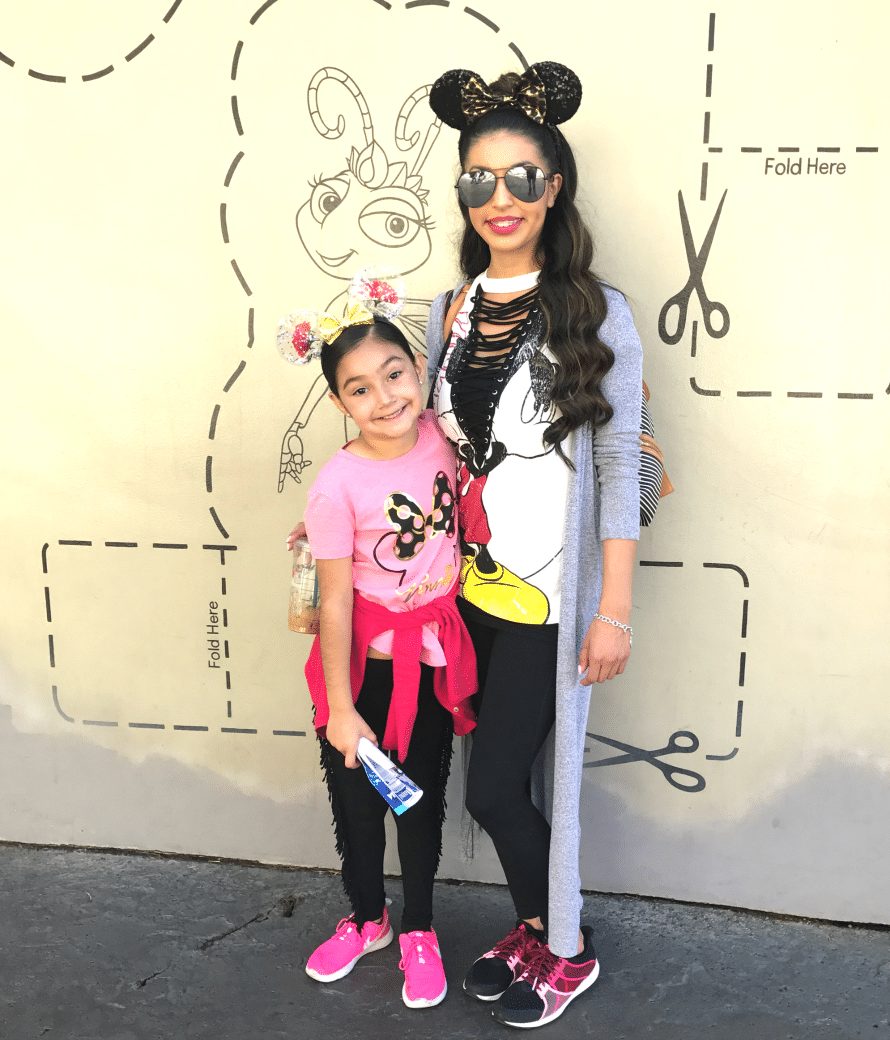
Ava was pretty impressed too, as you can see!

I’m still not even sure how the idea popped in my head, it was one of those strokes of genius.
I was even more excited about the idea because the new movie is coming out so soon.

Now came the logistics of it all. I wanted the ears to be transparent just like the glass that holds the Beast’s enchanted rose.
My first thought was to use plastic or vinyl, like the kind you would put under a table cloth or like the kind your grandma would have covering her nice furniture.
How I gathered supplies for these Beauty and the Beast DIY Mickey ears:
I headed off to the craft store and found some in the upholstery section. There are many different weights and thicknesses. I found one that was pretty thick and sturdy.
Next, I headed to the silk flower section and found small red roses.
Since all Mickey ears have bows in the middle, I hit the fabric section to see what I could find. By the craziest stroke of luck, I found a gorgeous yellow brocade fabric that had roses on it.
Perfection! It totally resembles Belle’s gown in the movie.

The only thing left to pick up: headbands. I got plain black ones that are about 3/4 of an inch thick. 
Now that I had all my supplies, It was time to construct! Follow along with the above pictures, starting at the top row, left to right.
Directions for DIY Mickey ear for Beauty and the Beast
Make a pattern for the ears. I found a roll of masking tape that looked around the size I wanted the ears to be.
I traced around it. To create the part the would attach to the headband, I placed it over the circle about half an inch from the bottom and traced. Then, I cut it out.
Next, I placed my ear pattern on top of the plastic and cut out four pieces. I used some giant washers as patterns weights instead of pins because the pins would leave permanent holes in our plastic.
Once I had my four pieces cut out I clipped two pieces together. I repeated this with the other two pieces as well.
Time to sew
You can use any thread you’d like, but I thought it’d be cool to use transparent thread.
Starting and stopping a half inch from the bottom, I sewed around the outer edge of the circle, using a half inch seam. It worked perfectly! Now that I had two sewn ears, I trimmed about 1/4th of an inch off the seam allowance to clean it up a bit.
Add the Beauty and the Beast roses
Next, I plucked the two silk roses off their stems.
I added one to each ear.
I originally wasn’t going to add any glitter to the ears, but the I spotted this chunky iridescent glitter.
I poured some inside the ear and immediately thought of how in the movie, every time a petal falls, magical glitter falls as well. Kinda like a snow globe! I like that it’d have some movement every time Ava moved her head.
Glue it up!
Now it was time to glue the ears shut. I left half an inch open on the bottoms of each ear so that it would lay flat and create a dome like effect and also so it would lay flat when I attached it to the headband.
To do this, I folded one side to the middle and placed a line of hot glue on the edge of the other flap. Then I folded it on top of the other edge to enclose it.
This seals up the ear and leaves a perfect flat surface to attach it to the headband.
I used small pins to mark where I wanted the ears to go on the headband. Two inches apart from each other, so one inch from the middle on both sides.
I the placed a line of hot glue on the bottom of each ear and then placed it on the headband.
Attach the bow
Now it was time to attach the bow. I sewed a quick one up using the fancy brocade fabric, there are TONS of Bow tutorials out there, or you can just use yellow ribbon!
I glued my bow to the center of the headband in between the ears and then wrapped a half inch thick piece of fabric around the center of the bow around the headband to finish it off.
I used a piece of black felt to cover up where I glued it so it would look nice and to ensure it wouldn’t come apart with the wear and tear of taking the headband on and off.
And that’s pretty much it!

The outcome!
Everyone kept telling Ava they loved her Beauty and the Beast DIY Mickey ears and asked where we got them while we were at Disneyland!
Such a great feeling for any maker right!? If you’re not going to Disneyland anytime soon, these ears would be so much fun to make to wear at the theater to see the new Beauty and the Beast movie. Ava will be wearing hers!
See you all next time!
Xx Meagan and Ava
Please come visit me at my blog, AvasLookbook.com – I have a lot of other projects for you to see!


que hermosa!! I loved the ears!!
Can you make a video tutorial
How did you sew the plastic? What kind of needle? The plastic sticks to my sewing machine, how did you avoid this?
Good question! There are two ways! 1. Lubricate the needle with sewer’s aid, or place tissue paper on the top and bottom and it will go through nicely!
These are amazing! I wanted to make ears for my daughter for our wdw trip, but never got to it. Maybe next year! You did a great job!
Did you glue the rose inside the dome
No…
Where did you get your shirt?
Hi! I actually got it from forever 21! 🙂
I would love these for my daughter. Can I pay you to make them for me? Please!
I’m thinking of making something similar but without the thread and different roses and bow. I currently make bows something like this on my Etsy account ShopGirlFoxBooks! Check it out and they’ll be up soon.
Your daughter is too cute! Great tutorial. Definitely going to try this!
Thanks Jennifer!! ❤️ Tag is in a photo of you do, I’d love to see! ????
what kind of plastic did you use?
Hi! It’s clear vinyl!
Hi! I don’t have a sewing machine, is there an alternate way to put the ears together (like super glue or hot glue?). I could technically try to sew it by hand, but I don’t think I would be able to do that.
Update: I ended up using vinyl super glue, along with some 16 gauge jewelry wire to form the ears, then followed the other steps as listed. They turned out great!
Awesome!! So glad to hear! ????
what an awesome tutorial, love it! tHANK YOU FOR SHARING
These are so cute! I want to find an excuse to make and wear these!
Making them right now!!! Thanks for sharing!
Do you need a special kind of needle in your machine to sew through the vinyl?
Your model is adorable!! My daughter will probably make these… thanks so much!