Let’s learn how to glitter a concrete floor!

Here is my DIY Glittered Floor tutorial! In the process of redoing our art studio, I wanted to go big and sparkly. We ripped up the icky carpet and found smooth concrete underneath. We went to Home Depot and bought a garage floor epoxy coating kit. I saw that it came with black and white decorative flecks, and instantly thought – “why not glitter?” We bought the sandstone color and I bought 6 jars of chunky gold glitter at Michaels.
UPDATE: Our floor has held up beautifully over the years, just as shiny and brilliant as ever. Swiffer does not work to clean, but a regular mop works fine.

Here’s how I covered and sealed my floor in glitter:
1 garage floor coating kit (found at home improvement stores, this is th eone I used – click to buy it from Amazon)
2 paint rollers, handle, 2 trays
1 scrub brush for cleaning the floor before you start
1 bucket and mop
8 jars of chunky glitter (I used the above)
Bowl to hold glitter
1 brush for edging
1 gallon of water-based polyurethane varnish, high gloss
Fans, open windows!
Directions:
1. Use the cleaner in the kit to fully clean your floor. Mix it in the bucket, scrub, rinse with mop.
2. Scrape off any glue, patch holes, let dry.
3. Mix the two parts of paint mixture (NOTE: If you want a gold floor, use the tan kit!) according to package directions. Stir vigorously. Seriously, this stuff is just like resin, you have to mix it really good or it won’t work!
4. Pour into one paint tray, use a brush to paint the edges of the room. I suggest having someone help you, you will be able to work faster.
5. Now use one of the rollers to paint a section of the room.
6. Throw handfuls of glitter in the air so it lands evenly. Don’t throw or toss it like chicken feed or it will land in piles or splotches. It’s ok if some spots are more covered than others as long as you use a matching color of paint – as in the TAN kit if you want gold glitter. The light reflection will make the entire floor look evenly glittered.
7. Keep working section by section, make sure to add glitter to cover the section lines so it will all blend.
8. If you want light glitter, just lightly toss. If you want heavy glitter, spread generously (like mine!).
9. Let dry over night, extra if you live in a humid climate. Use push broom to sweep off excess glitter. Scrub away areas that are too thick, you want it to all be even. Sweep up extra and toss it. You want the floor to be flake free, you want all the glitter to be sealed down to the epoxy covering.
10. Open can of varnish, apply in a test area first. Make sure it dries nice and clear. Here in Arizona, it dried very clear, no issues, but it might be different in other climates. So do a test patch first! Pour in the second paint tray and use second roller to apply an even coat. Let dry and add another coat. Repeat four or five times. You want the floor to be smooth so you can wipe up any spills.
11. Let dry for 2-3 days before moving in furniture or walking on it.
How to glitter your corkboards!
TIPS:
– If you use the flakes that come with the kit, toss those first and then add the glitter.
– Keep the window open in the room, keep the fans going. It’s stinky!
– If you miss a spot, don’t try to backtrack while the paint is wet, your feet will stick to the floor. I know from experience!
Check out this other tutorial too!: How to Make Oilcloth Car Mats!


Genius! I want to do my floor in pink.
OH MY GOODNESS!!! I ABSOLUTELY LOVE LOVE LOVE THIS IDEA!!! It is GORGEOUS!!! Wow! Thank you for sharing this!!! 🙂
That’s absolutely awesome!!! I love it!!!
LOVE it, Kathy! I will definitely link up at DecorHacks!
Yay! so happy you like it!!!
I don’t usually comment, but I do follow you and read. Love this so much! Very cool Kathy!
Wow!!!! That is truly eye catching. Soooo Gorgeous!
Bella Vida by Letty
Great job.
WOW!!! Coincidentally enough, we’re redoing our kitchen floor soon. I’m 100% positive that it does NOT have cement hidden underneath it, yet I must figure out a way to coat it all in glitter!
Great video. Love the “chicken feed” and “Quality Controllers”. The floor looks so fabulous, it will help you to be MORE creative and crafty!!!
So so clever and the floor is
B E A U T I F U L!!!1
<3 <3 <3
<3 <3 <3
This might just be the coolest floor I’ve ever seen!
Do you think this can be done over old tile or does it NEED to be over concrete.
Thanks!
The question about if it will work on tile – i think the paint has to “grip” on to some porous. if it is too smooth it could chip off. but if you don’t plan to put a lot of wear and tear (if it is a special room) it could work!
I love it! Your “inspectors” are pretty cute, too:)
Absolutely fabulous!
We had one of these floors in my church way back in the 70’s. The workmen wore golf shoes so they could walk around on the wet floor and get everything just right. It worked well for them. This looks gorgeous.
This is amazing! I would love to have a glitter floor
I think I just fell in love…will you marry me? What?….you’re already married and I’m a woman? So what anybody who loves glitter as much as I do….well she should be friends at least. I saw a glitter wall for a photo shoot and have been trying to figure out how to convince my husband to let me glitter a wall. If we were married it would be easy to convoke you, right? I had a secret crush on glitter before I stayed at the Gramercy Park Hotel in NYC- they have a Warhol that is all glitter. I now yell it loud and proud…. I LOVE GLITTER.
That is the prettiest floor I have ever seen! Yowza! Kathy, do you happen to know where to get Ranger Melt Art Beeswax in Phoenix? Having a hard time finding it without having to go out to the East Valley. Thanks.
Leslie
Found you via Apartment Therapy. That floor is Amazeballs! I love it!
LOVE IT! But I’m not sure why you tossed the glitter rather than mix it into the paint? Is there an advantage to tossing over mixing?
Good question!
Yes, big difference – paint is opaque. If you mix the glitter in, it will make the paint grainy, you won’t see the glitter, it will be covered in paint.
If it were clear then you could mix it in, like with clear resin.
You also would not want to mix glitter in the clear sealer because you want the floor to be smmoooth…
Can you do this on terrazzo flooring? Or strictly on concrete?
I do not have a cement floor. If anyone has done this on another type of floor, please let us know.
This is the bomb! I worship the glitter you walk on!!
Makes sense, Kathy. I always thought that glitter ceilings were done by mixing the glitter into the plaster, but apparently not? I just read on the Internets that there is something called a glitter gun that can be used to apply glitter to wet plaster. I had no idea such a thing existed!
Makes me want to pour cement in my kitchen. The floor is beautious.
My mission in life used to be to acquire a life-sized dinosaur sculpture to keep in my front yard. I have a new mission- to convince my Landlord (who is also my mother) to let me tear up all the carpet in the house and do this. THE WHOLE HOUSE. Holo hex glitter.
This is awesome!!
I hope you don’t mind by I just tweeted this out. TOTALLY awesome!
Ahhh!! I can’t take it!! Love love love!! I always tell Aaron how when we buy a house we neeeed a glittery driveway or roof!!!! Love love love!!
Happy Summer girl!!
xoxo Jenny
Freaking gorgeous! I want to rip up my carpet and do this right now! You are such a clever woman!
I SO wish I could do this to our kitchen or art room floor, but, alas, we rent. You are incredibly talented. Thanks for sharing your gifts.
Gorgeous!
Perfect! Been wondering what to do with my utility room in the basement!!!
I’ve never seen anything like this! EVER! Love it! I pinned it on Pinterest (with credits)!
http://pinterest.com/pin/72296459/
You can see how excited I am with all these exclamation points! lol
This is glorious Kathy. I really don’t have words to speak. Just a reasonable amount & some stuff is required to do this and you will get a glittering concrete floor. Thanks for sharing & i will try this soon.
Justwhiteshirts Web Store
Lowe’s has a glitter that you stir directly into paint then roll it on walls, ceilings or floors. I used it for several rooms in my house and everyone gives compliments!
LOVE!LOVE!LOVE!LOVE! Can you tell how much I LOVE this! Brilliant! ;0)
Think I might just have to try this out on a piece of furniture too.
http://once-upon-a-time-sacha.blogspot.com/
OH to the EM to the GEE.
This is the coolest thing ever. A gittered floor has never even crossed my mind until a minute ago, and now I wonder how I have ever lived without it!
Wow…
This is breath taking.
I asked my parents to do floor like that (but in red glitter and also red base color) and they said yes!
I’m just in love with this idea, never seen anything like this.
So, now my room will be redecorated and it will look awesome! They are going to redecorate the whole room just because of the floor. 😀
THANK YOU!
Ro.
I love this!!!! I want to do my dining/kitchen area!
I love it!!! Now I want to glitter the floor in our basement, only problem is … the basement is my husband’s workshop, I don’t think he’d agree. 🙂
I’m really psyched to do this in my studio- Yours is beautiful, and I’m surprised that I like the gold so much. I have a couple of questions, and I hope you haven’t addressed them in the video because I haven’t watched the video yet.
1. How big is your studio?
2. What size ‘jars’ of glitter did you buy? A regular little thing of glitter, even 4-6 of them doesn’t seem like enough to get the stunning effect that you did. I would hate to do this to my floor, only to have it semi-glittery.
Thanks!
Yeah, how big/what weight were your jars? I am plotting my own glittery floor, and I’m going to have to by off the net, so I need to know beforehand.
So impressive!
This comment has been removed by a blog administrator.
Love this idea and it proves all that glitters is gold!
I do honestly think this is the best thing I’ve ever seen. I am SO doing this one day. Bravo!!!
can’t thank you enough and (kismet!) found it just as my brand new concrete floors developed a crack. glittering starts in a half an hour, can’t wait! i went with aqua and turquoise with a tiny bit of red. i am also going to go with a clear epoxy coat on top – saves me 4 coats of urethane! wish me luck and THANK YOU!
ok, finally finished glittering the floor. I did a 10’x18′ room and ended up using a LOT of glitter, at least four of the little jars from michaels (6oz?), two lbs of chunky glitter that i ordered online, plus six of those really expensive fine glitters that you can buy at michaels. I wish I had just started with 5lbs, swept it up and used it for another project (there is a lot to sweep up the next day, but if the floors are clean, why not reuse?). i will say tossing it up in the air is harder than it sounds to get it to land evenly. turn off the fan until you’re done and wear a respirator! i also top coated with two coats of the garage epoxy in clear. on that second coat, since my glitter colors ended up being uneven as i started tossing in whatever i had, i added a tiny bit of resin dye to make it transparent blue and it’s GORGEOUS. now i just have to wait for it to cure and I can move in! thanks so much, again, i am going to love going to work in my studio.
I like glittery things and I can’t imagine that it’s on the floor this time. I might try it on one of my show rooms. It will attract people to view it and it will be fun to watch.
Just the most wonderful in everyway.
Clarifying question – you mention you painted the epoxy in sections and then tossed with glitter, then did another section. Was it difficult to keep the glitter off the non-yet epoxied sections? did you have to remove loose glitter from those areas if it got there or does it not matter? It seems like where the sections meet it might be difficult to get both the paint and the glitter even….
Thansks!
Everything about this is YES!
question: will effloressence bubble it up after a few months?
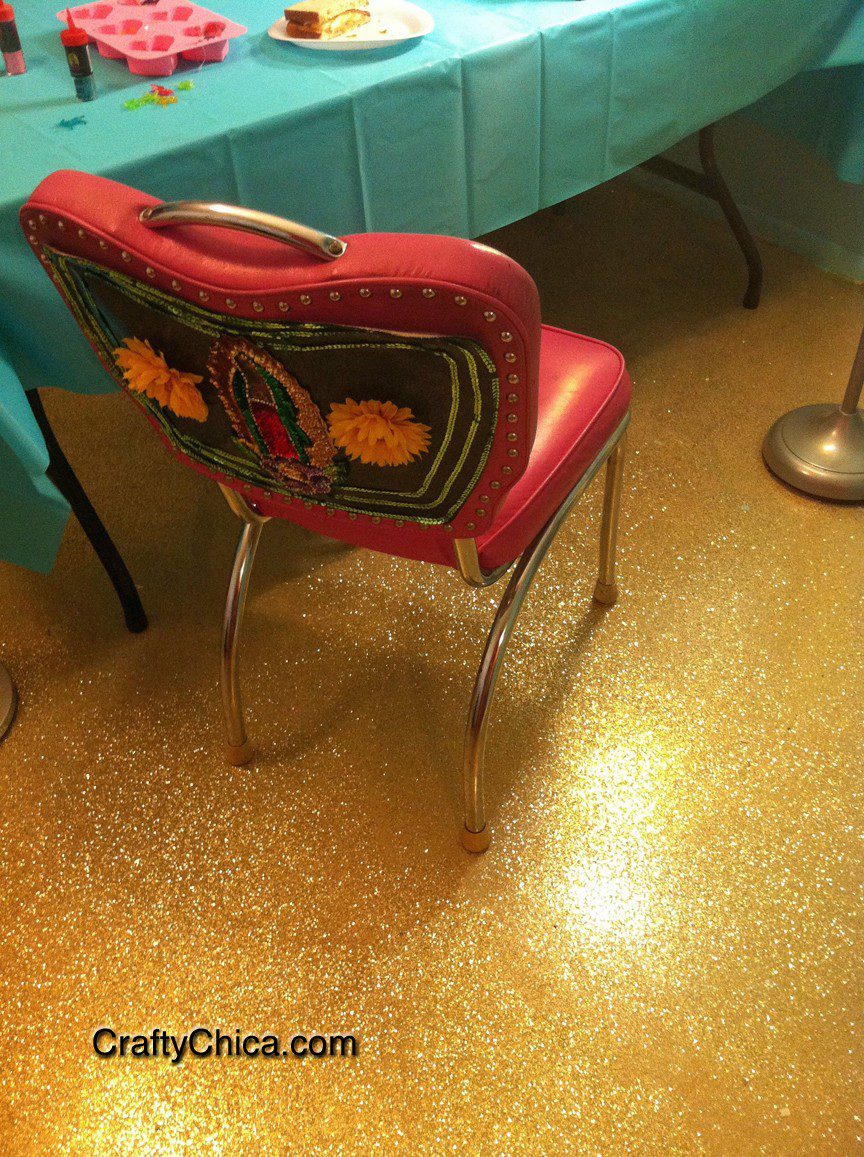
I love everything about this! BUT I need to know more about those chairs backs! I need details did you make them? HOW? & How is it attached to the chair back?
If you mix the glitter in the varathane, varnish and then apply it to the painted floor you can get a uniform coat and not have to sweep up the glitter.
Seriously LOVE LOVE!!! I am a glitter fanatic :):)
WHOA! That puts my painted floor to shame….absolutely fabulous!!!!!
That is awesome. Came over from Infantile Creative.
Cool! I’m diggin’ that red chair too! Where did you get it?
I want to do this for a counter I have a piece of plywood and was hoping I could get the same effect is that possible???
I’m not sure if it would work for a countertop to eat or have food near….but for a decorative area, sure!
I love this idea…so happy I found you!
Wow! That looks great. Pinned it.
Out. Ray. Geous!!!! I love this, you are kind of insane. In the best way!
Hi Kathy! This is one of the best things I’ve seen in a LONG time! My husband just broke the news that my girl’s floor is plywood under the carpet. 🙁 How could I do this on plywood flooring?
I love this too! I was wondering the same thing as RaquelitaMN, how you deal with overlapped glitter when tossing it in a section. Could you please explain?
How large of an area did you glitter? (I’m just trying to figure out how much glue to buy.) I’m also curious what you used to patch any holes in the floor.
Thank you!!
it was the size of a small living room and it took one box of garage floor paint, about 65.00 at the hardware store…
will you marry me?
Wow! This is amazing! I found you again through Stumble-upon. I talked to you about your blog/book deal at the Austin Maker Fair a couple of years ago and our girls had great fun making journals at your booth – they still have them.
This is amazing and I definitely plan to do the threshold to my den like this- 2 questions… 1- where can I buy bronze glitter in bulk 2- please clarify the size of the 6 containers of glitter you used
Love this idea! Wondering how slippery it is with the 5 coats of poly?
not slippery at all!
WOWWWWWWWWWWWWW! It’s stunning, I completely love it!
How pretty!!!!! Wow! If I wanted to use the sand color kit and use pink glitter I wonder if I would get a rose gold effect? We are doing this floor at the new salon we are building. I guess my question is would light pink glitter work on the sand kit or should I mix both pink and gold glitter?
If I was a bird, I’d happily die flying into your floor.
I wonder about using this on a tiled floor. Soon after installing our tiled floor, small cracks are running all over the place. Faulty tiles, but we laid them ourself so no recourse. Looking for a fix so we don’t have to rip them out. The cracks are visible when you point them out, most ppl do not notice, but still…I wonder how this works on tile. And mixing the glitter ito the varnish…hmm.
How much did it cost for the entire project?
This is amazing!!
Also – a grass seed spreader, if you can get your hands on one, will plant the glitter very evenly!
I have actually done a variance on this. I used a red base and added iridescent sparkles and the black specks. It turned out great, but I should have sealed with a clear coat.
I have actually done a variance on this. I used a red base and added iridescent sparkles and the black specks. It turned out great, but I should have sealed with a clear coat.
Just found your blog and saw this post….LOVE IT!!!!!!!!!!!!!!!! YOU ARE A GENIUS!!!! =) I WILL do this to my basement craft area, sometime in the future!!! Thanks for the fabulous idea!!! =)
This made my day! Thanks! 🙂
Any tips for how to talk my husband into letting me do this?
What size jars of glitter did you buy? I just ordered about 10 oz of opalescent glitter for my room, I’m not sure if that is enough or not.
Your floor is amazing!!!!
This would look awesome on the concrete kitchen countertops too!!!! Ohhhh the ideas!!
Oh how beautiful. We are going to redo a floor, and I want to do this. Thanks for sharing so much.
We just did our basement living room. We went over previously installed wood tiles. We cleaned the floor with warm water prior to using the epoxy and it bonded to the tile great (we did not use the “etching” powder provided with the epoxy). We did a mix of 6lbs black glitter and 3 lbs gold glitter over the dark gray epoxy (18×12′ room). As stated above it was difficult to get an even coating of glitter but the heavier patches actually add character to the already mezmarizing floor. Thanks for the fun idea!
Hi! I’d like to glitter the floor in a room, which size is around 3×3 meters. What do you think, how much glitter do I need for that work?
Hi! Was just wondering how this flooring is holding up for you after some time has passed? I’m thinking of doing it in a public art studio but thought I should consider any potential issues before taking the leap. Thanks for any insight you may have!
Hi Joy! It has held up beautifully, I Swiffer and sweep as necessary…
Thanks Kathy! I appreicate your feedback. One more thing…since you didn’t use the flakes that came with the kit (but obviously replacing with cool glitter), is the surface of the floor slippery? Particularly when wet? Since I’ll be using it in a commercial application, I need to consider safety.
Thanks again, and sorry to keep bugging you!
Love it! I was skeptical until I saw the rigorous inspection team. Then, I knew this is the real deal! A garage (man’s world) could be cool with silver and black glitter. So many things to try. Throw in some funky sequins, here and there. Your imagination is the limits with this project. Thank you for sharing! Great job, inspectors!
After watching your video, we’ve given our kitchen floor a makeover and have covered it in red paint, then red glitter, then 3 coats of epoxy varnish (the first coat having more glitter in/on it!), and it’s fabulous! Thank you for the inspiratIon 🙂
happy to see a do it yourself-er like you create an glitter epoxy floor using over the counter products. Came out really nice kathy. Good job. We usually install them using commercial grade epoxy flooring materials not commonly available to the public. How has the floor held up since installation? Especially under the chairs? Just wondering thanks.
It has held up beautifully! Thinking of doing another room, lol! At the time I did the floor, there wasn’t anything on the market I could find that would give this effect…so I DIYed it! 🙂
I know this a few years old but how has it held up till now? I am considering trying this in my event hall. It’s 5000 square feet.
It has held up well except for where my wheeled chair is. I use it every day and roll over the same spots. But the rest of it is beautifully intact!
Alona, Did you do your Event Hall? Very curious if this worked in such a large space, and what the cost was. We also have an Event Centre with old PVC tile, and it looks so aged, it would be great to find a way to jazz it up.