Here is how to make a DIY Valentine shadow box with mini-lights. This is a crafternoon project for February that you’ll want to display every year.
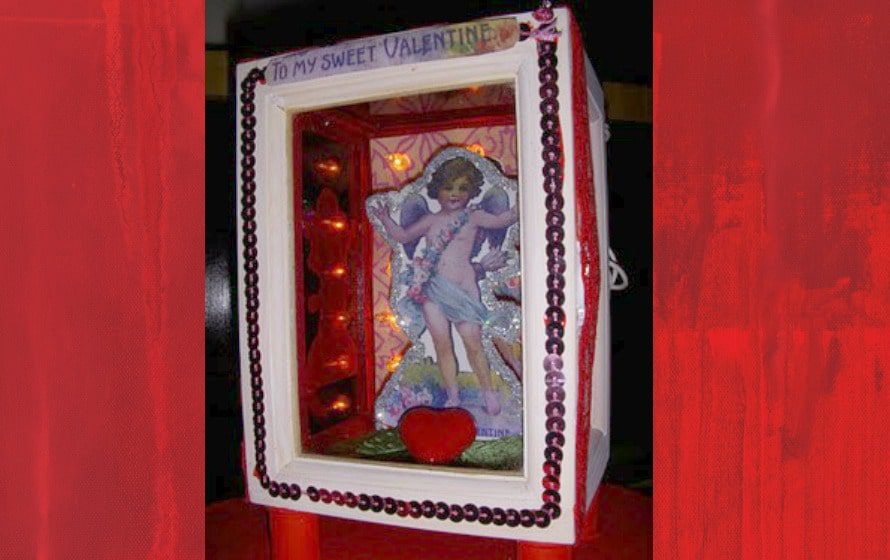
Use your favorite Valentine’s Day card, or a personal photo, to make a dimensional lighted shadow box. Actually, this concept can be used for any theme you want. I am so excited for when I have a break so I can make a whole bunch of these!
Supplies:
Small glass jewelry box
Acrylic Paints
Hand-held rotary tool
Glue
Decorative paper, pencil
Valentine image
Foam core
Scissors
Glitter
Battery-operated strand of 10 mini lights
Sequin trim
Wood beads for feet
Directions:
Paint the box and let it dry. Turn the box over and using the hand-held rotary tool, create 10 holes in the back of the box. Blow off dust.
Open the box and hot glue decorative paper to the back of the box. Use a pencil to poke through the paper where the drilled holes are. Glue the valentine image to a piece of foam core and cut around the edges.
Coat the edges with paint and sprinkle glitter over it. Let dry. Cut a small piece of foam core and then hot glue the image to it. With the box upright and the lid open like a door, hot glue the foam core to the inside base of the box, and then glue the image on top of it. Insert the mini lights (one light in each hole).
Glue the battery pack behind the box. Hot glue the door closed. Add sequin trim around the front of the box, and any other decorations you want. Hot glue wood beads as the feet for the box.
Thanks for checking out my post about this DIY Valentine shadow box with mini-lights!