One of the reasons I started making Latin-inspired crafts was to counteract the goofy Mexican-themed projects out there. I swear if I see another clay sombrero guy climbing in a tequila shot glass – I will cry!
I’m not about the Haterade, instead, let’s think of some nice alternatives! Like the traditional tissue paper flower. They are bright, cheery and super easy to make!
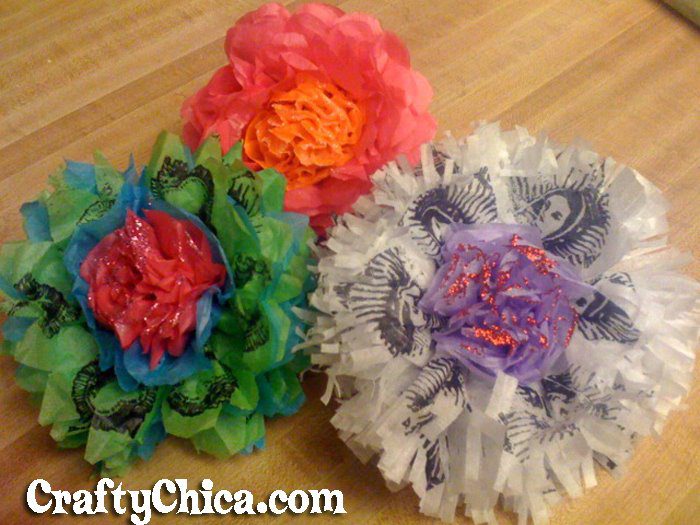
I made these tissue flowers as pins to wear at Maker Faire this weekend. I love making them, but after I made the first one I thought of the cool, pretty kits that Martha has out.
“OK, I am the Crafty Chica, I HAVE to do make my flowers different than Martha’s!” I thought.
After I cut the squares of tissue, I stamped them! High-five, por favor! I wish I had silver or gold ink, but black worked nicely as an alternative. I think these are stunning. There are very Carrie Bradshaw-goes-south-of-the-border. A contemporary spin on the tradition!
Here is how you make them:
1. Cut 8 pieces of assorted party tissue in squares, about 6″. Cut 4 squares that are 3″ square. If you want to stamp the tissue, do that now.
2. Stack them, and set the smaller set in the center. Accordion fold the stack.
3. Snip little notches on each side in the center.
4. Use a piece of pipe cleaner to wrap around the notches to secure the flower.
5. Carefully separate the sheets, and fluff them as you go.
6. Dab white craft glue and sprinkle matching (or translucent) micro glitter.
7. Turn over and hot glue pinback.

If you are having a Cinco party, or going out to a fiesta, or maybe attending a friend’s party – make these and hand them out. Your friends will love you for it!


The stamped tissue pins are just gorgeous! Thanks for providing the instructions! The girls and I might try them.
These are Fabulosos!Gracias Crafty Chica. Have a safe trip!
Fabuloso!
Say…………… Where is the glitter? 😉
Have I told… you lately… that I love you? Those flowers are beeeeeeautiful.
Ooh! I love them!
Hi, I’m trying to make these and having trouble with the part where I separate the sheets and fluff them up. The end result is always very obviously split down the center. What are you doing to make them so large and fluffy and round-seeming?
Hi Christopher! If the sheets are too big they will not fluff, try cutting your squares smaller, about 6-inches square. If you want BIG flowers, then add more sheets of tissue. Hope that helps!
Thanks, everyone!!
Gorgeous flowers and a wonderful idea. I’ll be trying this out. I’ll also be posting the link to my stamping group. I know they’ll be interested in seeing this new way to use stamps.
Wahh!!! I’m hopeless. What do you mean, accordion fold the stacks? Make what kind of notches exactly WHERE–and how do I fluff them up again?
hi sharon! you just fold them back and forth, like you were making a fan. and to cut the notches, just use your scissors and cut a tiny “v” at the bottom in the center. and then you fluff by carefully pulling out one sheet of tissue towards the center. next timei get a chance, i’ll diagram it!
one word. AWESOME.
Where can I get those stamps or any other stamps you use … jw