Whoa! Are you ready to make a huge sparkle statement? It’s New Year’s Eve and maybe you’re not going to a fancy soiree, but hanging out with friends. You can still get in the spirit with this quick and easy glittered shirt tutorial. Look though your closet for a fun T-shirt that you can glam up, or visit a discount department store and buy one. As long as you use permanent fabric glue, you are good to go. Okay, the clock is counting down – let me show you how to make this!

What you’ll need
- Pre-washed cotton shirt or other garment
- One bottle of permanent fabric adhesive
- Wide paint brush
- Poster board
- 2 jars of fabric glitter
- Hanger
- Cardboard or freezer paper
- Blue painter’s tape

Helpful Tip:To wash, turn the shirt inside out, wash on the gentle cycle, hang dry. If some of the glitter comes off, simply add more glue and more glitter.
Notes:Even though the glitter is stuck to the glue, you’ll still have a few flakes that will come off – especially with hugging at midnight! Just keep that in mind!
Variations:If you don’t want loose glitter, you can visit the craft store to find glitter fabric paint or iron-on glitter sheets.
How to make it
- Set the poster board on the table and insert the shirt form or freezer paper between the layers of the shirt. You want to insert something flat and that will not stick to the glue if it seeps through the fabric.
- Determine how much and what pattern you want for your glitter. Use the tape to mask off the area, so you’ll have a clean line.
- Squeeze the glue in a plastic bowl.
- Dip the brush in the glue. Make sure to get it nice and juicy on both sides of the brush.
- Use even brush strokes to apply the glue. Go in the up-and-down motion with the grain of the fabric. When you are near the tape, pat the glue so it won’t seep under.
- Pour the glitter along the top of the wet glue. Be generous! You want to cover every bit of fabric with glitter! Use your hands to pat the glitter into the glue. Scan the area to see if there are any spots that need more glitter. Lift the top of the shirt so the glitter falls down the rest of the wet glue. If necessary, pour extra glitter on any missed spots. Carefully pick up the shirt and place it on a hanger. Remove the cardboard from inside, as well as the tape. Let the shirt hang to dry for about an hour. When dry, remove from hanger and vigorously shake it to remove the excess flakes. I usually do this part in my backyard.
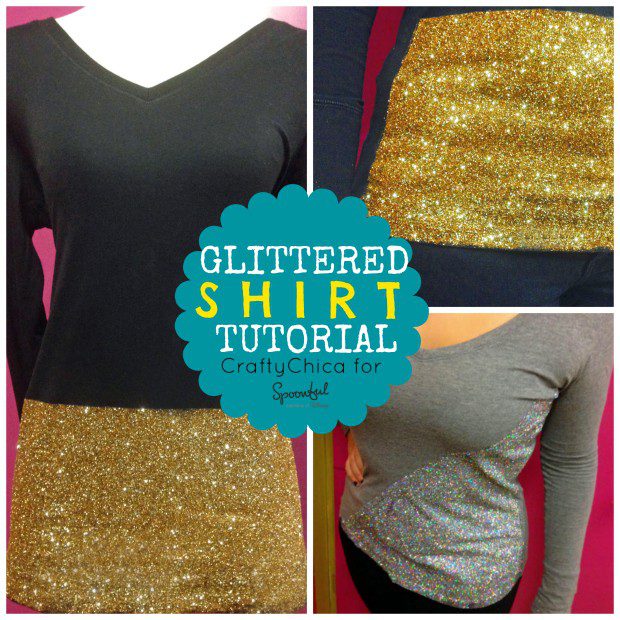
- Here is what it will look like! You can decide if you want to do a skinny band, or thick like this. You can go in an angle, or stripes, or just the sleeves or sides. There are so many options!


