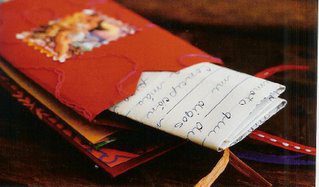
I love this project because it is all about presenting ordinary gift cards in an unpredictable way. You simply buy a few, and then make pages (that are actually small envelopes) so you can slip them in.
This is a great project for teens because you can put $5 from Starbucks, $5 from Borders, $5 from Target and so forth. They will feel like they are rich!
Supplies:
COVER A: 2 pieces of pattered paper, 5 x 7 inches each
COVER B: 2 pieces of thin cardboard, 3-1/2 x 5-1/2 inches each
COVER C: 2 pieces of patterned paper, 3-1/4 x 5 -1/4 inches each
(for binding the book)1 piece of fabric, 3-1/2 inches square
1 piece of cardstock, 3-1/4 x 8 inches
3 pieces of patterned paper, 5-1/2 x 6-1/2 inches each
Envelope pattern (open a large coin envelope to use as your pattern)
3 pieces of patterned paper, 3 x 5 inches each
Scissors, ruler, pencil
Glue stick, Aleene’s Original Tacky Glue
Embellishments for cover
Assorted pictures to glue inside the book
Make it:
1. To make the front and back cover:
– Take one of the COVER A pieces of paper, flip it over (front side down) and run the glue stick over the entire area.
– Take one of the pieces of COVER B and lay it in the center of COVER A. Rub your fist over it firmly, so it will bond.
– There will be paper flaps from COVER A that extend beyond COVER B. Fold these over and press in place. Smooth out any bubbles with your fingers. Repeat for the other cover. You will have two paper-covered pieces of cardboard
2. Makes the inside components
– Take the piece of cardstock, lay it vertically and mark off 1-inch hash marks all the way down until you have seven of them.
– Create sharp accordion folds on each hash mark, so you end up with an accordion folded 1-inch piece of cardstock. This is the foundation to hold the envelopes for your book.
– Now attach the accordion-folded cardstock to the covers by applying glue stick to the left outer flap, and pressing it along the right side of one of the covers. Rub in place to secure and make sure the ends line up straight. Now repeat by applying glue stick to the outer flap on the right side of the accordion-folded cardstock and press it in place along the inner left edge of the other cover of the book. This will make the basic book.
– Add the lining to the inside covers. Take COVER C, flip it over (front side down) and apply glue stick over the entire area. Attach this to the inside of each cover, to serve as the inner lining.
3. Make the envelopes:
– Using the envelope template, trace it onto on of the pieces of the 5-1/2 x 6-1/2-inch paper, repeat for other papers until you have three. Cut out the shape. Following the lines on the template, fold the envelope, and use the glue stick to secure the bottom and back flap. Repeat until you have made three envelopes.
– Attach the envelopes to the accordion folds. Think of the accordion folds as “hills” (up fold) and “valleys” (down fold). Open the book and line up one of the envelopes lengthwise so the back’s bottom meets the “hill”. Press in place. Repeat for other envelopes.
4. Close the book and rub your palm over it to make it nice and flat. Now attach the binding. Fold the fabric 1-1/2 inches on one side and repeat for the other side. This will create a 1/2 inch spine. Rub glue stick on both the inner flaps and slide it over the left side of the book. Smooth out any bumps or bubbles. Decorate the metal tag as desired and use the Aleene’s Tacky Glue to set in place. Insert gift cards, love letters and pictures in envelopes.
Tips: For sharper creases, use a bone folder and rub it over your folds. For straighter cuts, use a paper cutter. Both items can be found at local scrapbook stores. Be creative with your papers – use wrapping paper, butcher paper or even the inside of a brown paper bag. And It’s OK if your papers don’t line up right, it makes the book look funkier!
Take it to the next level!
· Create several books like this to use as bridesmaids gifts.
· Make a new book for each anniversary, or for special holidays.
· Simply increase or decrease the measurements to make the same book in a different size.
Another idea: You can put different things in each envelope, like a gift card in one, and then a letter in another, a picture in another and so forth. Maybe even theme them all!


I love this idea! Great video!